Image Map

Christmas Coffee Tote Bags!

December 29, 2010

I hope that everyone had a wonderful Christmas (I think I'm still recovering from all of the food and visitors!). :) I did a bunch of Christmas sewing this year, and wanted to share the latest version of the hot selling Coffee Burlap Tote Bags!


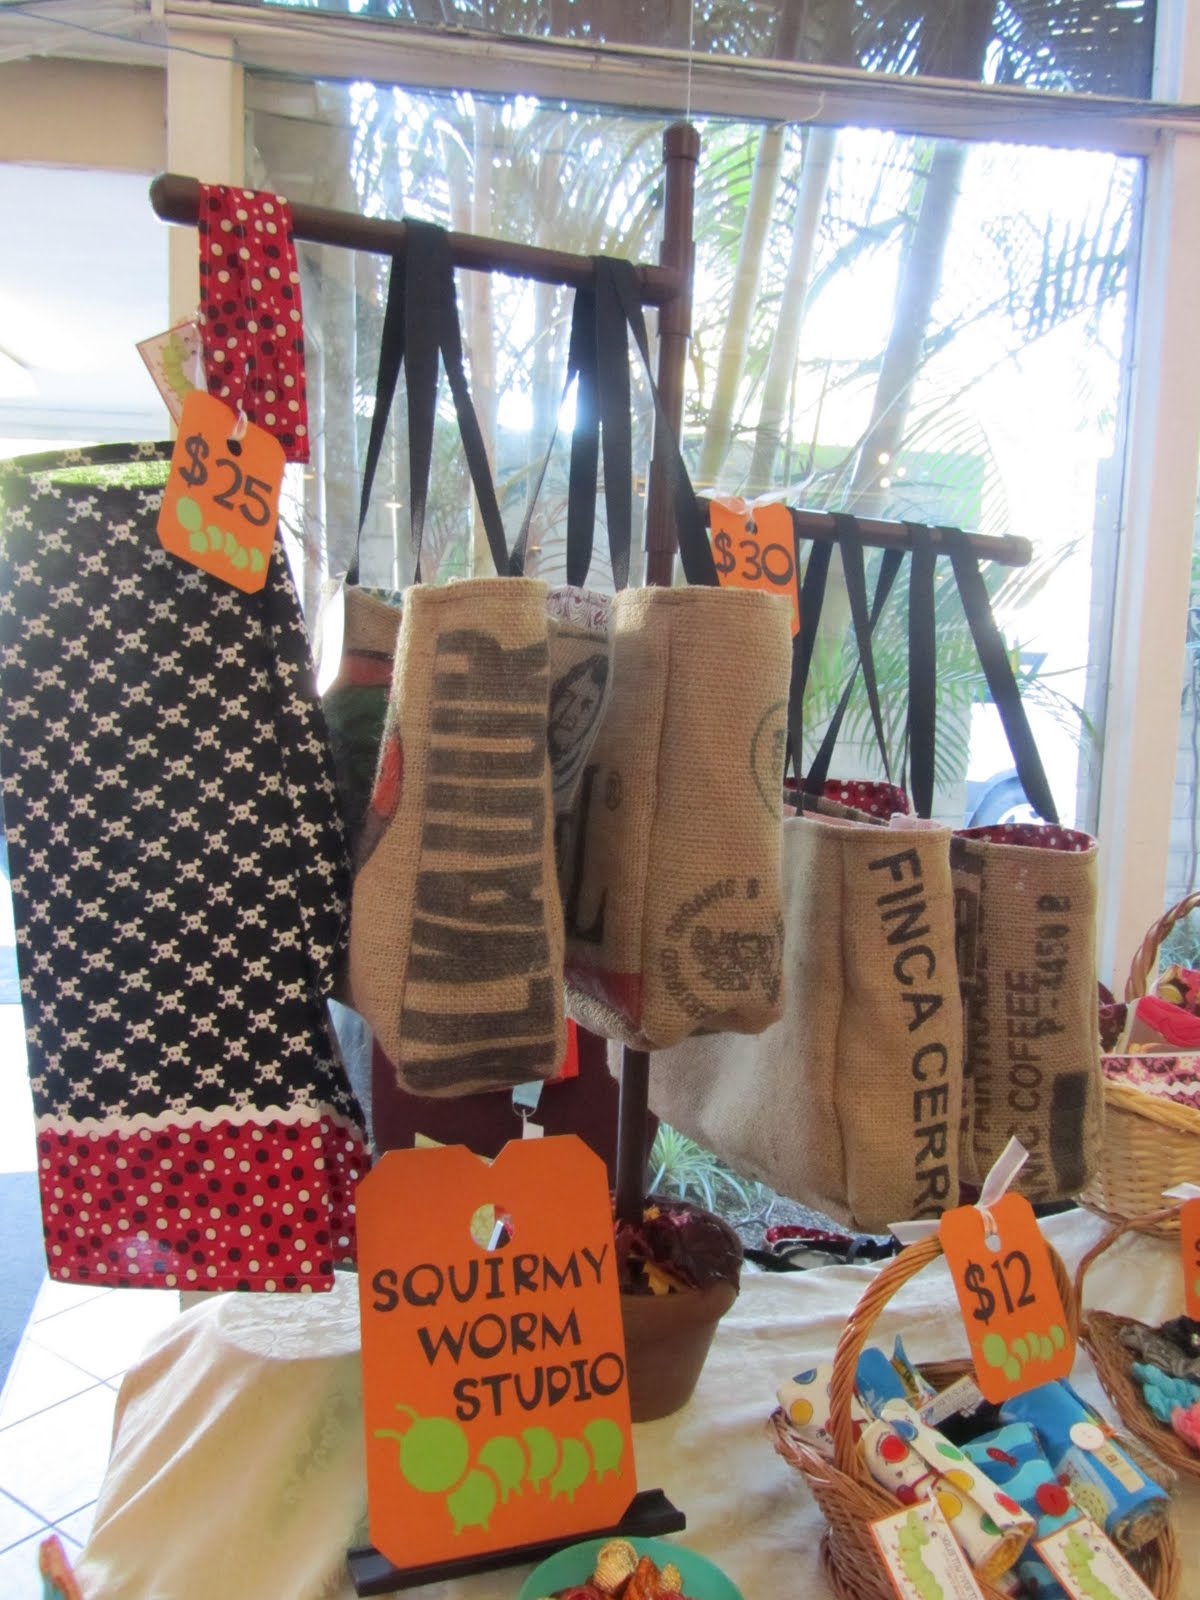
The first generation of the Squirmy Worm Studio Coffee Burlap Tote Bags were designed as a stylish and eco-friendly solution for beach bags, work bags, weekend/overnight bags, etc. The second generation of Squirmy Worm Studio's Coffee Burlap Tote Bags are more compact, measuring approximately 14" tall x 14.25" wide with a 5" gusset. These bags (as shown below) are perfect for an everyday tote and grocery shopping!

Front of my Aunt P.'s bag, with a red and white polka-dot lining.

Back

Front of my Grandma B.'s bag, with the same back as the bag above!


I also made two Brazil bags for my Grandma M. I only got a photo of one (with me in the background), but I can confidently say that she LOVED the bags! :)

Little Bitty Aprons!

December 23, 2010


Some of the best ideas for my shop come from my customers, and for that I am SO thankful! After seeing a photo of the aprons I made for my Momma and I for the Craft Show, my sister's co-worker placed a custom order for two children aprons! What makes the story even better, is that the aprons are going to two sweet little girls that are getting play kitchens for Christmas!


Not having made a child's apron before, I headed to Kohl's with my measuring tape in hand, to take some much needed measurements! The aprons turned out great and measure a perfect size 4t!

Time Is Flying By!

December 8, 2010

I'm alive (just in case you were wondering!!!). I've been a bit busy the last couple of days, well technically starting as of last Friday because....I'm working! It's not a 40 hour a week job, but that is a-okay with me, as it has been a challenge to get back into the groove after being a full time Etsy gal for the past five and a half months! For those that want all of the details- I'm working as an independent due diligence consultant for a local architect, performing all of the front end research/investigations needed for our client to make a final decision on a site (exciting- eh?). It is very much what I was doing at my last job, which was a good fit. I found myself a niche! :)

When I'm not at work I REALLY need stay focused, as I have a couple of custom orders to sew up, and with all of the leftover time I'm going to have (HA!) I need to make some Christmas gifts! I procrastinate every year when it comes to shopping and making Christmas gifts. One would think that I would have learned my lesson a time or two, yet I find my self in the same situation. Plus, quite frankly the post office terrifies me this time of year, so the earlier I finish up the custom orders, the better off I'll be! Speaking of handmade Christmas gifts (I'm determined to get them done!), have you heard of the Handmade Pledge? I LOVE giving and receiving handmade gifts- what about you? :)

Diaper Pod Sewing Pattern- Now Available for Purchase!

November 30, 2010

I'm writing this post with a nervous stomach, as I FINALLY took the plunge and published my very own Diaper Pod pattern for purchase on Etsy...eeks!!!


The Diaper Pod pattern is a 4 page PDF file featuring clear and concise directions with 12 supporting step-by-step photos. I hope the pattern is a hit, as I already have plans to work on a pattern for my Thread Catchers! :)

Cyber Monday Coupon Code!

November 29, 2010


Just a friendly reminder...I've posted a coupon code on Squirmy Worm Studio's Facebook page! In celebration of Cyber Monday, Squirmy Worm Studio is offering a percentage off all purchases made today, 11/29/10! Enter the coupon code during checkout and the discount will be applied! If you have any issues feel free to contact me at squirmywormstudio@gmail.com.

Happy shopping! :)

Cyber Monday...Etsy Style!

November 21, 2010

(Source)

Cyber Monday is a week away! Black Friday scares me, due to the crazy crowds and sleep deprived people, however I can do Cyber Monday! :)

I have plans of sewing like a crazy woman this week in order to prepare the shop for the Cyber Monday shoppers! I have product that I need to photograph and upload to Etsy from the Craft Show, but in addition I have plans of sewing up new Coffee Burlap Tote Bags, Large Zippered Pouches, and of course some of the Appliqued Zippered Pouches.

Stay tuned on Squirmy Worm Studio's Facebook page, as there just might be a discount code issued in celebration of Cyber Monday! See you then! :)

PVC Pipe Handbag Display Tutorial

November 19, 2010

Weeks and days leading up to my first Craft Show I agonized about how I was going to display the Coffee Burlap Tote Bags, as I wanted them off of the table as they would have taken up WAY too much real estate on the table! :) I looked online for inspiration and came up empty handed, so I sat down with a sketch pad and pencil and came up with a PVC Pipe Handbag Display, and would love to show you how I went about constructing my contraption!


This is the sketch I started with (no laughing please...I never dreamed of making this sketch public, but thought it was a must with this tutorial!!!).


The shopping list for this tutorial is quite simple:
  • Terra Cotta Pot (I washed up a pot that I found in the garden= free!)
  • Plaster of Paris (I bought my bucket at Michael's with a 50% off coupon- score!)
  • 3/4" PVC Pipe (I bought the 10' pipe at Lowe's for only $1.68, as it was much cheaper than buying the pre-cut 2' pipes!)
  • 3/4" PVC End Caps (3)
  • 3/4" PVC Tees (3)
  • Spray Paint
I started out by cutting two 16" arms (+/-), one 30" vertical support, 6" vertical separation (between arm #1 and #2), and a 4" vertical top piece. Please note that all measurements are approximate and can be altered to meet your needs!

After I cut the pieces I started assembling the contraption. Just remember that every arm needs a Tee fitting as well as an End Cap, and the top of the contraption needs to be finished off with an End Cap. :) I suggest the contraption is spray painted at this point in the process, and any required touch-ups to be completed after the Plaster of Paris is set.

In addition, I cut four spare pieces to anchor my vertical support piece. The spare pieces were 100% trial and error (see photo below). My goal was to provide extra support at the bottom of the contraption so that I did not have to hold the vertical piece while the Plaster of Paris set and hardened.


After the contraption is assembled and nestled into the pot, I lined the pot with plastic (to cover the hole at the bottom of the pot!) and prepared the Plaster of Paris. I do have to caution you that my pot did crack a bit as the Plaster of Paris expands as it hardens, however I positioned the pot so that the crack was in the back and no one (except me!) noticed! :)

The completed PVC Pipe Handbag Display...painted and ready to go!

My First Craft Show Experience...

November 14, 2010

I'm happy to report that I survived my first Craft Show experience...woo hoo! The Craft Show was a small venue, with only a few handmade vendors, thus more of a Holiday Boutique, but nonetheless I enjoyed myself and everyone enjoyed my Coffee Burlap Tote Bags- score! :)

The Vendor Aprons worked like a charm! :)

Before leaving the house I organized all of my merchandise and put them into baskets, thus we had a quick (and painless) setup!


I had agonized about how I was going to display the Coffee Burlap Tote Bags for weeks before the Show, and unfortunately came up empty handed after searching on the internet for ideas/tutorials. I sat down with a sketch pad and pencil and came up with the PVC contraption shown below...which worked like a charm! I'll post a mini tutorial on how to make a handbag display piece on Tuesday! :)

So Close, Yet So Much To Do!

November 9, 2010

It's officially Tuesday, and the Craft Show is Friday afternoon- yikes! If you're local and are thinking about stopping by (yeah!), all of the details are provided below...


I feel as though I have completed much of the required preparation, yet my to-do list is still intense! The sewing portion is almost complete as I worked on seven Coffee Burlap Tote Bags yesterday, which need to be top-stitched, and then they are ready to make their debut at the Craft Show! :)


In addition to completing the Coffee Burlap Tote Bags, I need to:
  • Complete my table set up (we did a trial run last weekend, and I was pleasantly surprised that I had much more product on the table than I had anticipated!).
  • Coffee Burlap Tote Bag display (this is probably the biggest item on my to-do list!!!). I sketched up a PVC pipe display to place on my table where the Tote Bags would hang at eye level. With time not on my side, I need to decide today whether or not I'm going to make a display or place the Tote Bags in a basket on the table....ahhhh decisions! ;)
  • Price tags (we'll be making cute worm tags, with the Cricut machine, to attach to all of the baskets on the table that will have the price and info about the product).
  • Cut out fabric 'Squirmy Worm' letters to temporarily adhere to the fall bunting I received at the Craft Swap (I plan to hang the banner at the front of my table).
  • Print Squirmy Worm Studio stickers to adhere to the brown kraft bags I picked up for all purchases.
  • Swing by the bank for change, etc.
  • If time permits, I hope to make a few more of the Appliqued Zippered Pouches...

Travel Jewelry Rolls and Thread Catchers!

November 2, 2010

After countless hours in the studio, I'm so happy to introduce my {completed!} Travel Jewelry Rolls and Thread Catchers! :)


The Travel Jewelry Rolls consist of two zippered compartments, a ring holder, and two velcro compartments. All Rolls were made with love, and I hope they will be loved and used by women everywhere!


The Thread Catchers (which also double as Scrap Bags for Scrapbookers and Crafters!) consist of a weighted bag with non-slip grip, thus it will sit on any table, and a generous trash bag for your favorite seamstress/crafter!

With the Craft Show being less than two weeks away (eeks!), I've been sewing day and night (well, not technically, but it sounds good!) preparing products. Have you been keeping an eye on my inventory count (right hand sidebar, at the top)? As of last night I only have 13 more items to complete to make my goal, although between you and me I'm hoping to exceed my goal! :)

Feeling Lucky???

November 1, 2010


My sweet friend Lindsay, of Paint Me a Picture, is celebrating her two year blog anniversary and Etsy shop re-opening by having a Giveaway Day!

If you have a little one (or perhaps an upcoming shower) you'll want to make sure to enter Giveaway #5, which consists of a hand embroidered robot card (The Joys of Jess), a set of flannel space and polka-dot burp cloths (donated by me!), and a personalized two sided robot/space ship painting (Paint Me a Picture)! With that said, head on over to Lindsay's blog and enter to win one of the six giveaways! All giveaways are open until November 4th...best of luck! :)

Skull iPod Cozy!

October 27, 2010

Is it just me, or is sewing for men just plain hard? My Dad travels a lot (a lot might be an understatement!) and I wanted to sew him a little something for the road. He mentioned that he didn't have a case for his new iPod, thus his one-of-a-kind skull iPod Cozy!


I sat down one afternoon, with out a tutorial, and started out by measuring the height and width of the iPod. I added the needed seam allowances to both dimensions and started sewing! The Cozy is fully lined and has a layer of quilt batting, which helps to protect the screen from any minor accidents! :)


Next on my Miscellaneous Sewing To-Do List (after the Craft Show is over!) are cell phone cozies for my Momma and I! I'll start out by measuring the height and width and adding the appropriate seam allowances, just like I did for the iPod Cozy, but perhaps this time I'll write up a tutorial to share with all! :)

So Very Exciting!!!

October 23, 2010

Totally tutorials tips tricks recipes how tos

My Fabric Kindle Cover Tutorial has been featured on Totally Tutorials- woo hoo!

If you haven't checked out Totally Tutorials, make sure to take the time to do so, as the blog is a wonderful collection of tips, tricks, tutorials, and how-tos (my favorite!).

In addition, for all of the inquiring minds...I'm working on wrapping up my Diaper Pod pattern (I've volunteered my Momma and sister to test out the pattern to make sure the directions are clear and concise!), as well as my Thread Catcher pattern/tutorial (I haven't decided which yet). Thanks again for everyone's support, as I couldn't do what I've been doing without you!!! :)

Fall 2010 Craft Swap

October 20, 2010

As a follow up to Monday's post, I'm so excited to share with you what the Craft Swap group made for the Fall Swap.


I think this post calls for proper introductions!

The Fall 2010 Craft Swap group consisted of Shana, Momma, Kiara, Me, Sherri, and Debbie (who was out of town on a business trip...boo!).


First up is Shana's Craft Swap Project...Fall Bunting!
(The Bunting is beautifully sewn and the fabrics and colors are spot on!)


Jingle All The Way Shadow Box by Momma!

(Such a fun and unique holiday decoration. I might have to make a couple of these for gifts this year!)


Scrabble Tile Pendant Necklaces by Kiara!

(I love the graphics Kiara used. Who knew that Scrabble tiles could be so versatile?)


Darling Pincushions and assorted goodies by Sherri!

(I never knew that pincushions could be this cute! I love mine and have it next to my sewing machine, as I'm too nervous to use it- HA!)


Silverware Roll-ups by Debbie!

(Such a great idea, as the roll-ups are perfect for picnics, potlucks, camping, etc!)

I hope you've enjoyed the recap of the Fall 2010 Craft Swap! :)

Trying To Streamline My Production Process...

October 19, 2010

I've always had high goals of streamlining my production process, as I think it is the secret to any successful business- right? From the get go the most tedious part of my production process is making my cute (and must have) Squirmy Worm Studio tags!


For the most part, everything that leaves my studio is either tagged with a Squirmy Worm Studio tag or a Handmade by Candice tag, both of which take precious time to make. I've been thinking about it for a while and wonder if delegating the making of my Squirmy Worm Studio tags to Miss Label is right for me.

Do you use sewing tags, and if so do you make your own or buy them from a professional? :)

My Craft Swap Project...Revealed!

October 18, 2010


Saturday's Fall Craft Swap was a huge success!!! I thought long and hard about what I wanted to make for my Craft Swap project and since all of the Swap members sew, I thought that Thread Catchers would be the perfect project! :)


I unfortunately got a slow start, as I wasn't able to find a pattern for a simple Thread Catcher anywhere. I had come across some samples at various quilt stores and was confident that I could write up a pattern for the perfect Thread Catcher. I started out my making a prototype and wrote down some important dimensions and then I let time get away from me and found myself having to make another prototype, giving me a second opportunity to write out clear and concise directions (like I should have done the first time!), before proceeding with my assembly line.


I can't tell you how happy I am of how the Thread Catchers came out (the Swap group was stoked too!). Everyone that has seen the finished product asked how much I charged for them, which got me thinking about making some additional Thread Catchers for November's Craft Show! :)


Make sure to come back tomorrow to see what the other members of my Craft Swap group made...they never cease to impress me with their creative abilities!!! :)

What I've Been Up To...

October 14, 2010

We all know it's been 10 days since my last post (I've been told a time or two!)...I guess it's time to confess that I temporarily lost my mojo (very sad!). Have you ever had the urge to sew/craft, but everything you touched just didn't work out? That's how the last week or two have been for me, but don't fret as I think I finally found my mojo- whew! :)

While looking for my mojo I had time to cut fabric and prep items on my 'to do' list for the Craft Show (which is less than 30 days away...I'm such a procrastinator!!!).
  • I've prepped four Coffee Burlap Bags, so hopefully by next week I'll have four tote bags complete for the Craft Show!
  • I have three Travel Jewelry Rolls/Cases cut and prepped...just waiting to be sewn up!
  • I also have five Appliqued Zippered Pouches prepped (three argyle and two owls).

The Craft Swap is this Saturday! In a normal world I would have completed my project weeks ahead of time (hard to believe, but totally possible), however this time around I only have 3 complete (as of tonight...with 2 to go- eeks!). My Craft Swap project was a little more involved than I first thought, but definitely worth all of the blood, sweat, and tears! :) I'll post the big reveal photo on Sunday!

Definitely Worth the Wait!!!

October 4, 2010


If you've been following me for a while now, you know that I'm smitten with burlap coffee tote bags, and that I've been working on the perfect proportions/design for WAY too long. I finally sat down Saturday to work on and complete a tote bag, as I had planned on gifting it to a sweet friend on Sunday (nothing like waiting until the last minute!!!).


I experienced a few setbacks on Saturday, but was able to complete a stylish burlap coffee tote on-time, and without any tears- woo hoo! :)


The bag measures 17" wide x 13" tall and 6" deep. The handles have a 9.75" drop from the top of the bag, perfect length for both hand and shoulder carrying. The handles were sewn a couple of times for extra support, and the bag is fully lined. What do you think? :)


I'm working on additional tote bags for the Craft Show, and hope to add some to my Etsy shop in the near future. As always, if you are interested in a product or are thinking about a custom order, please feel free to email me at squirmywormstudio@gmail.com!

Yellow + Blue= Green!

September 30, 2010

After many months in the making, I'm happy to report that this quilt is complete and in the hands of the owner- woo hoo!


The quilt beautifully plays on the yellow, green, and blue color combination incorporating prints, stripes, and polka dots. The backing is a continuation of the front, utilizing one of the flowered prints, but in a blue on blue color combination (rather than white on blue).


I hope that my sweet friend Kara enjoys her new quilt and that it will be used to keep her and her hubby warm during the cold months (side note- I'm so over this current heat wave!!!). :)

The Curious Pug's Curiously Crafty Giveaway!!!

September 27, 2010


Exciting news for all...I'm participating in The Curious Pug's Curiously Crafty Giveaway!!! :) I'm one of ten blogs/shops that is participating in this big giveaway, which gives YOU ten chances to win something great- woo hoo!

The giveaway is open until October 8th, so make sure you hop on over to The Curious Pug to enter to win my Flower Appliqued Zippered Pouch and nine other great prizes! Best of luck!!!

Argyle With Style!

September 26, 2010

An argyle baby quilt...I don't even know where to start!

I love argyle as it is so clean, simple, and everlasting; and baby quilts, well they are small, colorful, and always aim to please/comfort a child. The two combined, if I say so myself, make one awesome newborn gift! My Momma whipped up this beauty for a family friend's granddaughter!


I love the contrast of the green against the pinks and the jumbo (1 13/32") yellow ric rac really finishes off the quilt!


The quilt back continues the green and pink color combination! If you are in love (like I am!) and are interested in making your own argyle baby quilt, the pattern (Argyle With Style by Bate and Taylor) is now conveniently available at JoAnn's. Great job Mom!!! :)

Christmas Came Early This Year!!!

September 22, 2010

I woke up Saturday morning thinking it was going to be a normal, non-eventful day...but boy was I wrong! :) My Momma had her eye on a new sewing machine (a huge upgrade from my current machine), so we trekked out to the sewing machine store and test drove a couple of samples before stumbling on this beauty...


I bought my original machine in January 2009, an entry-level Singer, as I hadn't sewn in years (and I'm totally not exaggerating!) thus I didn't want to buy a super nice machine as I wasn't sure how much I would use it! Never in my wildest dreams did I think I would do as much sewing as I've done in the past 21 months, let alone open my own Etsy shop! My parents thought I needed an upgrade, thus Christmas 2010 (and a couple subsequent Christmas/Birthdays/Etc.) came early this year...


I've been sewing over at my parent's house, but now with two machines I'm taking up valuable real estate on the dining room table- HA! I plan to transition over to the new machine in the next couple of days, but will keep my Singer for all of the dirty/experimental jobs (aka coffee burlap tote bags!).

From Left to Right: my new machine, my old machine, my Momma's machine! :)

While I was taking the above photos and reading the user's manual my parent's yellow lab was nudging my arm, wanting a photo of course...so here she is, Miss Maggie!